Why shallow window depth changes the installation
An inside-mount shade sits within the window opening, so the casing must provide enough front-to-back room for the brackets, roller, fabric roll, and any valance or cassette. A shallow recess can make a standard shade project past the trim, rub a handle, or leave less clearance than the manufacturer requires. The right answer depends on the exact product—not on a universal depth number.
That distinction is important: a product’s minimum installation depth is the minimum room needed to fasten it inside the opening, while its flush-mount depth is the greater depth needed to hide the headrail or cassette behind the front edge of the trim. The two measurements can differ by more than an inch. For example, one SelectBlinds roller installation guide lists a 1-inch shallow-mount minimum and a 3¾-inch flush-mount depth, while Levolor’s roller-shade technical guide lists different requirements by headrail and valance configuration. Always check the instructions for the chosen model and options rather than copying another shade’s specification.
If your recess is tight, do not assume the shade must be abandoned. A smaller headrail, exposed roll, extension brackets, or an outside mount may solve the fit. World Wide Shades can help compare configurations, and our guide to inside- versus outside-mount shades explains the appearance and coverage trade-offs.
Measure the recess before choosing hardware
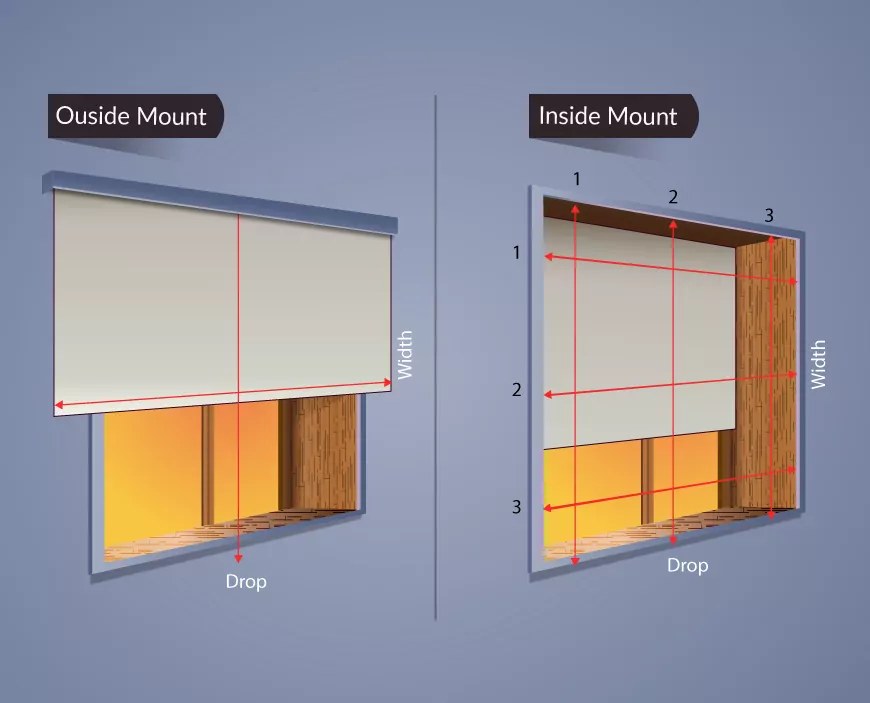
Use a steel tape measure and check the recess at the top, middle, and bottom of the opening. Record the shortest clear depth, not the most generous point. A frame can be slightly tapered, and projecting hinges, sash locks, window cranks, tile, or a lip at the front edge can use up the space that a bracket needs.
Measure from the glass-side surface of the jamb toward the room, noting where the casing ends. Then measure around likely bracket locations on the left and right. If a handle projects 1¼ inches into the opening while the rest of the jamb measures 2 inches, the handle may set the practical clearance even though the frame itself appears deep enough. Photographing the tape in place is useful when comparing product drawings later.
Measure the opening width at the top, middle, and bottom. Record all three values and identify the narrowest. For a custom inside mount, the supplier may make a deduction for operating clearance; do not subtract an extra amount unless the order instructions tell you to. The vendor’s deduction accounts for its hardware and fabrication tolerances. If the opening varies by ⅜ inch, for instance, entering the widest figure can cause the headrail to bind at the narrow end.
These measurements are for selecting a product; they are not a reason to cut a shade at home. Custom shades may have model-specific deductions and minimum sizes. World Wide Shades can review your dimensions through the shade builder before you order.
Open and close the sash, rotate the crank, and move any tilt latch through its full range. Confirm that the proposed fabric path will not hit the handle, lock, or screen. On a double-hung window, check both sashes; on a casement, check the crank’s sweep. Leave room for a hand to operate the hardware after installation.
If the window is deep at the center but has shallow side returns, check the bracket footprint in the installation drawing. A shade may fit in front of the glass yet have nowhere for its mounting screws. This is one reason “depth of the recess” and “depth required for flush mounting” should be treated as separate values.
Compare shade profiles that work in a tight opening
An exposed roller usually takes less vertical space than a covered cassette, but its roll remains visible. A compact fascia may conceal the roll with a smaller projection than a full cassette, depending on the manufacturer. A larger fabric roll can also increase the required clearance, especially for a tall or wide shade. Ask the supplier for the product’s actual bracket and roll dimensions.
Fabric openness affects what the shade does, not just how it looks. A 1% solar-screen fabric blocks more direct view and glare than a 5% openness fabric, while a more open weave retains a clearer outward view in daytime. Openness percentage is a measure of the fabric’s open area, not a promise of privacy at night. For more detail, see our fabric openness-factor guide and compare the best roller-shade fabrics.
Before choosing a fabric, hold a sample against the actual glass. World Wide Shades offers fabric swatches so you can see how color, weave, and light transmission look in the room. A swatch can also help you determine whether the fabric edges will pass close to a projecting handle or trim detail.
Decide between inside mount, brackets, and outside mount
An inside mount preserves the trim and keeps the shade close to the glass. It is often a good choice when the frame is square and deep enough, and when you want adjacent windows to share a clean line. The trade-off is small light gaps along the sides, which are expected for a roller shade mounted within the jamb.
Extension brackets move the headrail forward without moving the shade completely outside the opening. They can clear a shallow return or an obstruction, but they create a more visible projection into the room. Verify the bracket’s projection and screw placement; a bracket cannot correct an opening that has no solid material for fastening.
An outside mount attaches to the wall or trim above the window. It avoids the recess-depth limit and can cover more of the window perimeter, but the wall or trim must provide a secure anchor. Measure how far beyond each side the shade should extend, and confirm that the headrail will clear crown molding, adjacent walls, and window trim. For a rental, check what kinds of fasteners are permitted; our renter’s guide to roller shades covers reversible choices.
If you are planning a do-it-yourself install, read how to install roller shades before drilling. The guide covers level placement, bracket alignment, and handling the tube without damaging the fabric. When an opening is unusually shallow, a brief fit review from World Wide Shades is often less costly than filling and repainting misplaced screw holes. Send dimensions or ask for help through contact, or call World Wide Shades at (844) 674-2716.
Install carefully when the product fits
- Confirm the product and orientation. Match the label, width, bracket type, and left/right controls to the window before unpacking. Check the instructions for whether the shade is designed for an inside mount and whether it needs a minimum gap.
- Mark the bracket locations. Hold the headrail in the opening, centered as directed by the manufacturer. Use a level across the marked points. A headrail that is not level may make the fabric travel unevenly, a problem discussed in our roller shade alignment guide.
- Check the screw bite. Confirm the screw length and the material behind the jamb. Do not drill into glass, glazing channels, or a hollow trim cap. If the frame is metal, masonry, or a thin decorative overlay, use the specified fastener or consult an installer.
- Attach the brackets and test the fit. Tighten screws without twisting the brackets. Snap the shade into place according to its manual, then lower it several inches and raise it again. It should clear the sill, handles, and surrounding trim.
- Stop if the tube binds. Do not force a shade into a narrow opening or bend a bracket to make it fit. Remove the shade and compare the actual opening with the product’s installation-depth drawing.
The World Wide Shades team recommends checking the fit while the shade is still easy to remove. A dry run can catch a handle collision or an oversized cassette before the product is put into daily service. For a quote that accounts for the recess and hardware, use the custom shade builder; our custom-versus-retail guide explains what dimensions and configuration details affect fit.
Common mistakes to avoid
Treating every “minimum depth” as flush depth. A shade can technically attach inside a recess while still projecting toward the room. Decide whether a visible headrail is acceptable before ordering.
Measuring only one side. Old frames can be out of square, and trim can be thicker on one side. A single measurement hides those differences.
Ignoring the operating clearance. A crank handle that clears a stationary shade can still hit the fabric or bottom rail as it rotates. Test the complete movement.
Making an unapproved deduction. If the supplier asks for the opening size, submit the measurement requested. Do not subtract ⅛ inch or ¼ inch as a guess; custom makers may apply their own deduction.
Cutting or modifying the headrail. Shortening an assembled shade can expose the mechanism, weaken the mounting point, or void warranty coverage. Ask the manufacturer before making any change.
If the frame is too shallow, the safer decision is usually a different mount or a shallower profile—not a forced fit. World Wide Shades can help identify which option suits the window and the room. Call World Wide Shades at (844) 674-2716 or request a fit review.
Frequently asked questions
There is no universal number. Some roller-shade guides allow a shallow installation at about 1 inch, while cassette or flush installations can require several inches. Check the exact product’s depth chart and measure the narrowest clear point in your opening.
Minimum depth is the room required to install the brackets or headrail inside the window. Flush-mount depth is the room required to recess the entire headrail or cassette behind the front edge of the trim. A shade may install successfully without sitting flush.
They can move the shade forward to clear a shallow return or hardware, if the product supports those brackets and the mounting surface is secure. They do not create additional fastening material inside the jamb. Confirm projection, screw location, and fabric clearance before ordering.
Measure the opening at the top, middle, and bottom and record the narrowest width. Submit the value and format requested by the seller; many custom manufacturers apply a product-specific deduction. Adding an extra deduction can leave an avoidable side gap.
Often it is the simplest solution when the recess is below the model’s minimum depth. It also offers flexibility to cover more of the window opening. The wall or trim must support the brackets, and you should check that the shade clears nearby molding and walls.
Do not trim a finished shade unless its manufacturer gives instructions for that exact model. The cut can damage the drive mechanism or weaken the bracket area. Ask World Wide Shades to review the measurements or choose a different profile instead.