A motorized shade remote can stop working after a battery change, a power interruption, a new shade installation, or an accidental channel change. Pairing is the process of teaching a motor which remote or channel should control it. The reliable fix is not to press every button at random; it is to identify the motor, isolate one shade, confirm power, and use the correct pairing sequence.
This guide covers common radio-frequency remote workflows without pretending that every brand uses the same commands. World Wide Shades can help identify the motor and replacement remote; contact World Wide Shades with a photo of the remote, motor label, and shade headrail.
Pairing versus programming
Pairing links a remote or channel to a motor. Limit programming tells the motor where to stop. A shade can be paired but have incorrect limits, or have good limits but no paired remote. Treat them as separate steps.
If the remote moves the shade but the shade stops at the wrong height, read how to set motorized shade limit stops. If the motor hums or clicks without movement, use roller shade motor humming but not moving instead of repeatedly pairing.
For new installations, see smart home motorized shade setup. World Wide Shades can help choose a control ecosystem before you buy a replacement remote that cannot communicate with the motor.
Before you reset anything
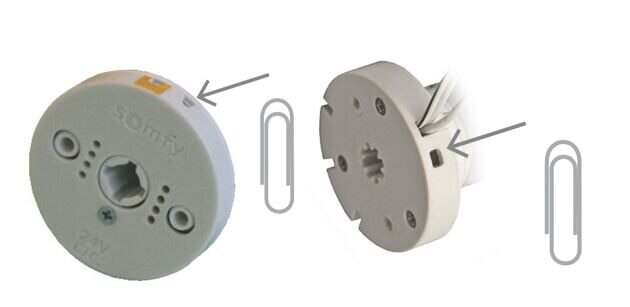
Take photos of the remote front and back, battery compartment, shade headrail, motor label, bridge, and any program button. Record the remote brand, channel count, LED color, and whether the shade is battery-powered, plug-in, or hardwired. A five-minute record can save an hour of guessing.
Replace the remote battery with the exact type and orientation shown in the compartment. If the shade has a rechargeable motor, charge it; if it is plug-in, confirm the power adapter is seated. A hardwired shade should be checked by a qualified person—do not open energized electrical enclosures to troubleshoot a remote.
A shade with no power cannot pair. A remote with a weak battery can light its LED but fail to transmit enough reliably. Test with a fresh battery before erasing a pairing.
Select the individual channel, not “all shades” or a room group. If the remote has 5, 10, or 15 channels, the active channel may be indicated by a number or a small light. Point the remote toward the shade from 3 to 10 feet away during setup.
Move other shades out of the selection if the system allows it. Pairing with the group selected can add a shade to every selected channel or remove multiple shades at once.
General pairing workflow
Button names and timing differ, but most remote systems use this sequence:
- Select the target shade or channel.
- Put the motor into learn or program mode with its program button, power cycle, or a remote command.
- Press the remote's pairing or stop button when the motor jogs or beeps.
- Confirm the shade jogs again, indicating that the link was stored.
- Tap up and down to test direction.
- Exit program mode before testing another shade.
A “jog” is usually a brief up-and-down movement or a short vibration. It is a confirmation, not a full open or close. If the motor does not acknowledge the command, stop and check the model-specific manual rather than holding buttons longer.
Some systems pair by pressing a program button on the motor for 2 seconds; others require a remote combination; others use a bridge app. World Wide Shades can tell you which path applies when you share the model. Request pairing help before using a factory reset.
Step-by-step remote pairing checklist
Set the remote to the channel assigned to the shade. If you are replacing a lost remote and do not know the channel, start with a single unassigned channel and test one shade at a time. Label the channel after the shade responds.
Use only the motor or remote command specified for your system. A short program press may enter pairing mode; a longer hold may erase limits. Watch for a jog, LED change, or beep that confirms learn mode.
Press the documented pairing, stop, or confirm button once. Do not repeatedly tap up and down while the motor is learning. Wait for the acknowledgment, which may be a jog or a light.
Tap up and down. If the direction is reversed, use the motor's reverse-direction procedure before setting limits. Do not keep running a shade downward when the bottom bar is moving toward an obstruction.
First prove that the individual shade works. Then add room or whole-home control. Group setup is easier when every shade has a known channel and correct limits.
What to do if pairing fails
Install a fresh battery, confirm polarity, and clean visible contacts with a dry cloth. If the LED still does not light, the remote may be defective. World Wide Shades can help identify a compatible replacement, but remote frequency and protocol matter more than appearance.
Check shade power, select the correct channel, move closer, and remove metal obstructions. A remote can be paired to a different shade or locked to a group. Try the documented learn procedure on one shade only.
The motor may be at its maximum device count, in a different protocol mode, or still paired to an old controller. Some systems need a partial delete before a new remote can be added. Do not factory-reset until you know how to restore every pairing and limit.
Clear the incorrect channel using the manufacturer procedure, then pair the correct shade while physically near it. Label the channel immediately. For a multi-room project, keep a channel map next to the bridge or remote charger.
Replace the battery, check the antenna path, and test from the same room. Typical indoor range can be roughly 20 to 100 feet depending on walls, metal, interference, and the radio system. A bridge or repeater may improve whole-home coverage, but it cannot fix a failing motor receiver.
Replacing a lost or damaged remote
A universal-looking remote is not necessarily compatible. Match the motor family, frequency, protocol, channel capacity, and region. Some remotes pair directly; others require a bridge. A replacement remote may also need a special procedure to preserve existing limits.
Before ordering, send World Wide Shades a photo of the old remote or motor label. Ask for a compatibility check, or use the World Wide Shades builder if you are replacing the entire shade with a current motor platform. Call (844) 674-2716 for help with an older installation.
Remote pairing and smart-home hubs
A hub can become the control point even when a handheld remote is still paired. Pair the remote first, verify local operation, then add the bridge or app. Name each shade by room and window, such as “Office west window,” rather than “Shade 3.” Clear names reduce accidental group commands.
After adding a hub, test local remote control, app control, group control, and one scheduled scene. If the app shows a shade as unavailable, check bridge power and radio range before deleting the motor from the app. For integrations, compare Alexa and Google Home motorized shades.
Safety and limit preservation
Keep cords and bead chains secured and away from children and pets. The Consumer Product Safety Commission window-covering safety guidance explains the hazards of accessible operating cords. Motorized does not mean every control location is safe; a loose remote can still be a choking hazard for young children.
Pairing should not require bypassing a safety device, removing a cover from an energized power supply, or holding a motor against an obstruction. When a reset is necessary, record existing limits and channel assignments first.
For a replacement plan, World Wide Shades can help select a current motor, fabric, and control combination. If you are refreshing several rooms, browse the 2026 window shade trends for ideas that work with modern controls. Explore shade options or request a consultation.
FAQ: motorized shade remote pairing
The common causes are a depleted battery, unpowered shade, wrong channel, lost pairing, radio obstruction, or incompatible remote. Check those in that order before using a factory reset.
Select one shade, enter the motor's learn mode using the model-specific command, press the documented pairing or confirm button, wait for the acknowledgment jog, and test up and down. Button timing varies by manufacturer.
A normal pairing step may preserve limits, but a factory reset often erases limits, favorites, and other pairings. Confirm the reset type in the manual before proceeding.
Usually, yes, if the remote and motor family support channels or groups. Pair and test each shade individually first, then assign the group so a mistake does not affect the whole room.
Start about 3 to 10 feet from the shade with a clear path. After pairing, test normal room range. Metal, concrete, appliances, and distance can reduce radio performance.
World Wide Shades can help identify compatible control hardware when you provide the remote or motor details. Contact the team or call (844) 674-2716 before ordering a replacement.
A calm, documented pairing process protects your existing settings. Identify the motor, isolate one channel, confirm power, pair once, and postpone group and smart-home setup until the individual shade is reliable.